10/4 Prototype Presentation
Skinning Tools
Binding skin using Bind
: Select the head, eyes, and upper body, Display, Hide > hide selection
: Select the skeleton and geometry, Skin > Bind skin, ***Max influences 3, Dropoff rate 4
Testing skin using animation
: Auto key turned on, Animate > Set key
: Set key for hip, ankle, toe, and Set key 5 frame and bend the body
: Set key frame 10 move feet and rotate it
: Do different animation for the leg
Pruning small weights
: Select the geometry, Vertex mode, Select one vertex
: Skin > Prune small weights, 0.3
Painting skin weights
: Skin > Paint Skin Weight tool
: Holding down B for size of the brush
: Gradient > Use Color Ramp
: Paint operation, Replace
: Opacity 1, Value 0
Editing skin weights in the Component Editor
: Select Vertex, Window > General editors > Component Editor, Smooth Skins
: Hide Zero Colum
: 1, only affect by that joint
: Spine Root, select the all colum and type 1
Mirroring skin weights
: Select the geometry
: Skin > Mirror Skin Weights, YZ, Direction checked, Closest point on surface
Using Interactive Skin Bind
: Skin >Interactive skin biind, Volume type: Capsule
: Grab the Capsule and adjust
Refining skin on the upper body
: Skin > Interactive Skin Bind Tool
: Do Paint Skin Weights, Prune Skin Weights, Component Editor, and then Mirror Skin Weights
Using skeletons to create a jaw
: into Side view
: Skeleton > Joint tool, Head joint, connect the inside of mouth and outside of mouth
: Name Jaw, Teeth
: Select the collar joint
: Select the skeleton and head geometry, Skin > Bind Skin
Refining jaw weighting
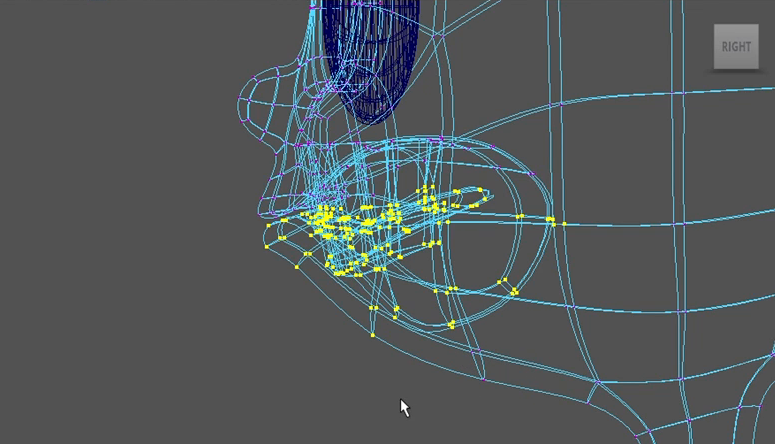
: Select the Jaw bone and set key, rotate down
: Side view, vertex mode, 3 smoothe
: Lasso select the lower part of the vertexes
: Component Editor, Jaw 1
: Select > Inverse
: Component Editor, Head 1
: Soft select(Fallloff mode:surface), select teeth, Head 1
: Select the jaw points, Head 0.5
: Select the neck, Neck 0.5, Head 0.5
Advanced Facial Rigging
Setting up a control panel
: Using Curves/Bezier curves create the control panel
Limiting controller motion
: Control panel BG, put in the layer and template it.
: Do lock and hide unnecessary attributes
: Limit information, Translate
Rigging basic facial controls using set driven keys
: F shape – Window, Animation Editors, Blend Shape
: Rclick the number and set drive key
: Load Driver, Mouth Fffff, Load Driven, Blend shape1, Key
: Translate X 1, and blend shape, Key
Rigging the jaw using set-driven keys
: Set Driven Key
: Mouth Jaw(controller) Translate X, Driver
: Jaw, Rotate Z, Driven
: Mouth Jaw(controller) Translate X, Driver
: Jaw, Rotate Y, Driven
Rigging pupil controls
: Select the geometry of eye, AE, PolyPlanarProj2
: Projection Height and Width
: Set Driven Key, Pupils, Load Driver, polyPlanarProj2, Load Driven
: Pupils translate x, right and polyPlanarProj2 width 15 or more, Key
Controlling eye direction
: Select the geometry, Set Driven Key, Controller Translate X, Eye Rotate Y, Key
Controlling eyelids with expressions
: Select the eyelid top controller
: Select the face geometry
: Blend shape window, find the Upperlid left
: Window, Animation Editor and Expression
: Object Lidtop controller, Attribute Translate Y
: In Blendshape, right click the Number section and Create Expression
: Copy Selected Object and Attribute
: In expression box, copy paste the names and put =
: reverse 1-name
: blendShape1.E_UpLidL=1-Lid_TopL.translateY
: blendShape1.E_LowLidL=1+Lid_BotL.translateY
Using expressions to rig mouth controls
: Select Sneer Controller
: Blend Shape editor, Sneer, Right click, expression
: blendSahpe1.M_SneerL=(1+Sneer.translateX)/2
: blendSahpe1.M_SneerR=(1-Sneer.translateX)/2
: blendSahpe1.M_SneerL=Sneer.translateY*(1+Sneer.translateX)/2
: blendSahpe1.M_SneerR=Sneer.translateY*(1-Sneer.translateX)/2
Creating a smile/frown control using expressions
: Blend Shape editor, Smile, Right click, expression
Smile
: blendSahpe1.M_SmileL=max(0,Smile_Frown.translateY)*(1+Smile_Frown.translateX)/2
: blendSahpe1.M_SmileR=max(0,Smile_Frown.translateY)*
(1-Smile_Frown.translateX)/2
Frown
: blendSahpe1.M_FrownL=max(0,-Smile_Frown.translateY)*(1+Smile_Frown.translateX)/2
: blendSahpe1.M_FrownR=max(0,-Smile_Frown.translateY)*
(1-Smile_Frown.translateX)/2
Finalizing the Rig
Cleaning up the rig
: Layer window, hide skeleton, Geometry R, Group Geometry, Lattices display hide, Face control in the master control
Testing the rig
: Auto key set
: Animation > set key
